In this article, we list down some essential Safari tricks for iOS that you can use to get the most out of your browsing experience.
1. 3D Touch Shortcut
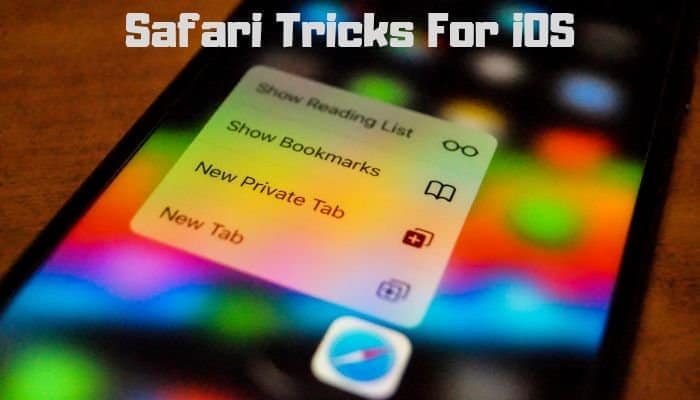
Apple introduced 3D Touch with the introduction of iPhone 6s. And if you happen to use an iPhone 6s or later model, you should start using the 3D Touch feature on Safari (and on other apps, for that matter). You can do this by hard-pressing and holding on the Safari app icon. After which, you will see a couple of different action options like Show Reading List, Show Bookmarks, New Private Tab, and New Tab. Drag your finger to the one you want to execute and let go of it.
2. Quick Search
There are times when you want to search for something instantly. For which, you either have some text or URL copied in your clipboard. In such instances, instead of tapping on the search bar (which opens the keyboard) you can instead tap and hold on it to open an action pop-up that says, ‘Paste and Go’ – for copied URLs or ‘Paste and Search’ – for copied text. It saves you the extra step of pasting the item in the search bar and then clicking Go, which you would have to go through, otherwise.
3. Request Desktop Site
Albeit, the mobile version of a website is ideal for use on devices with smaller form factor, it sometimes fails to showcase enough information on a single page. Also, in some cases, there are times when you are only familiar with the Desktop version of a website. This is why accessing the Desktop version of a website can turn out to be useful in such situations. Not to mention, the trick can also come in handy if you use an iPad, as you can view more content on its bigger screen-estate. To access the Desktop version, with the mobile version of the website open in a Safari, press and hold on the reload button (on the right-hand side of the search bar). After which, a pop-up with two options, ‘Request Desktop Site’ and ‘Cancel’, appears. Select ‘Request Desktop Site’, and you are now on the desktop version of the website. Alternatively, you can also tap on the Share button and scroll through the row to find ‘Request Desktop Site’, and click on it.
4. Access Reader Mode
A website usually contains a bunch of additional elements, in addition to text, to make it look more appealing and engross the end user’s attention, which, in general sense, is normal and acceptable. Except, in situations, when, you just want to focus on the ‘text’ part of it, without getting distracted by graphics and advertisements. For such times, you can switch to the Reader Mode on a website. To do this, tap on the four horizontal lines on the left-hand side of the search bar. And that’s it. You’re now in the Reader Mode. Alternatively, you can also tap and hold the icon, to either enable Reader Mode on the website you are currently on, or on all websites, using ‘Use on …’ or ‘Use on All Websites’, respectively. Further, you can customize the Reader Mode by tapping on the ‘AA’ button on the right-hand side of the search bar. Here, you will find a bunch of different customization options like changing the background color, changing the font size, and changing the font type. Select and customize the one you want to change. Do note that some websites might not offer support for reader mode.
5. View Recently Closed Tabs
If you are in the middle of search with multiple tabs open at once, and somehow, you accidentally close all open tabs at once, this trick can turn out to be a lifesaver. With the tabs closed, hit the Tab icon and press and hold the ‘+’ icon. A list of all the recently closed tabs (with links) shows up. From here, tap on a link to open the webpage.
6. Find on Page
Similar to how you use the Command + F or Ctrl + F shortcut on a computer to do a quick lookup on a webpage, there is a neat little trick on Safari for the same. Considering you have the webpage open, hit the Share button and scroll through the row until you find ‘Find on Page’. Tap on it, and enter your search query. Alternatively, you can tap on the search bar at the top and enter your search query there. After which, you will see a list of suggestions. Tap on the one under ‘On This Page’ to find the ideal result for your query.
7. Swipe to go Back and Forward
Although the back and forward arrow buttons on the lower left and lower right side allow you to navigate back and forth between pages, they, however, are hard to reach on bigger iPhones. And therefore, using swipe gesture, as an alternative, makes more sense on these devices. So, now every time you browse on Safari, you can either swipe from left-to-right or right-to-left to navigate between webpages.
8. Offline Reading
There are times when you come across interesting articles, which, you wish you could save offline or read later. At such times, the offline reading feature can come in handy. To add an article to offline reading, with the webpage (for the article) open, hit the share icon and tap on ‘Add to Reading List’.
9. Reorder Tabs
Although some might be aware of this trick, a few will find it surprising. Consider a scenario, where, you are researching for something on the internet, and want to switch between a few selected tabs back-and-forth. In such a situation, reordering tabs to arranging them close to one another can turn out to be helpful. To reorder or rearrange tabs, hit the Tabs icon and press and hold on the tab you want to move. And then, drag it to the position you want.
10. Change Search Engine
If you don’t like a particular search engine and want to change it with your preferred search engine of choice, Safari allows you to do so. For this, head over to Settings > Safari, and tap on ‘Search Engine’ under ‘Search’. From here, tap on the one you wish to add as your default search engine.
11. Quick Domain Extensions
Similar to most other tricks that simplify your experience on the app, this trick makes entering web addresses much quicker and simpler. Instead of typing extensions like .com .in .org, etc you can rather tap and hold on the period button to bring up different domain extensions. And from here, drag on to the one you want to enter and release the button.
12. Back to Top
When scrolling through a webpage, sometimes you get stuck in the scrolling up and end up at the bottom. And realize that scrolling back to the top is not something you wish to go through. To avoid this tedious process, you can tap on the time (displayed at the center of the screen), right at the top, to go back to the top of the webpage.
13. Restrict Websites
If you hand out your smartphone to your young ones at home and do not want them to access certain websites. Or, if you want to limit your smartphone usage and want to block a few particular websites during your work hours, you should consider this trick. For this, go to Settings > Screen Time > Content & Privacy Restrictions, and turn it ON. From here, go into Web Content and select from ‘Unrestricted Access’ – to access everything, ‘Limit Adult Websites’ – self-explanatory, or ‘Allowed Websites Only’ – to allow access to only the listed websites.
14. Share a webpage using AirDrop
Similar to how you use AirDrop to share media with other iOS devices, you can also share webpages on Safari using AirDrop. To do this, open the webpage you want to share and click on the Share button. Now, tap on AirDrop and select the device from the share sheet.
15. Add Website to Home Screen
The bookmark feature on browsers allows quick access to websites that you visit frequently. But, it still requires you to open the app and click on the bookmarked item. To save this extra step of going into the app every time you want to open a website, you can add your most frequently visited websites to the home screen. For this, open the website you want to add and hit the Share button. From the share sheet menu, scroll through to find ‘Add to Home Screen’, and tap on it. You will now see an app-like shortcut for the website on your device’s home screen.
16. Swipe to Close Tabs
Although you can hit the ‘x’ button on the top-left corner of a webpage to close it, it is sometimes tricky to press that little icon. As an alternative way, first, tap on the Tabs icon to view all the open tabs, and from here, swipe left on the tabs you want to close.
17. Close All Tabs
The usual methods, tapping on the ‘x’ icon or swiping left on a tab, work fine when you need to close a couple of tabs. However, it becomes a mundane and repetitive task when you have a lot of open tabs. So, in such instances, instead of going around closing one-tab at a time, you can press and hold the Tabs icon and choose the ‘Close All x Tabs’ option to close all open tabs at once. Using this option, you can also close a single tab using the ‘Close This Tab’ option and open a new tab using ‘New Tab’ or ‘New Private Tab’.
18. Create PDF from a webpage
In addition to allowing you to save a webpage offline, to revisit it later, Safari also allows you to turn a webpage into PDF. For this, open the webpage you want to save as PDF and hit the Share button. From the Share sheet, scroll through the row to find ‘Create PDF’, and tap on it. Now, on the next screen, edit the PDF if you want and tap on ‘Save File To…’ and select the storage location.
19. Preview a webpage
A search engine provides a list of webpages (with links), as a result, in response to your search query. And at times when you are in a hurry, going in-and-out with each suggested result can be a tedious process. So, for such times, if you have an iPhone 6S or later, you can 3D touch (hard press) on a link to have a peek at its content. And when you are done, let go of it.
20. iCloud Tabs
If you want to pick up on your on-going search on Mac (in Safari), and want to continue with it on your iPhone/iPad, this trick can turn out handy. For this to work, you should enable iCloud-sync on Safari, on both your devices. With the tab (you want to open on your iPhone) open in Safari (on your Mac) hit the Tabs icon in Safari on your iPhone and scroll to the bottom to find the iCloud suggestion (for the tab open on your Mac) under your Mac’s name. Those are some of the best tricks (for Safari on iOS) to help you get the most out of your browsing experience. Follow the guide to learn how to use these features and experience the difference.