For anyone who needs to protect their Windows folders from unauthorized access, setting up passwords for the folders is the best course of action. Unfortunately, Windows doesn’t have a direct option that lets you set a password for a folder on your computer, but there are a few workarounds you can use instead. With this password protection, you’ll no longer have to worry about someone accessing files that you want to keep secret. In this article, we’re going to talk about the best ways to password protect folders in Windows 11/10 in a way that you can easily do with your folders as well.
6 Ways to Password Protect Folders in Windows 11/10?
There are a number of methods you can use to password protect folders on your Windows PC, and we will discuss the best of them below:
Method 1: Password Protect Folders With OneDrive
Every Windows computer comes pre-installed with OneDrive, a cloud storage service from Microsoft. This program has an option called Personal Vault that lets you protect your files with a password. This password-protected folder can store up to three files, but if you have a Microsoft 365 membership, you can use this feature without any restrictions. Since it includes additional features that prevent unauthorized access to your folders, it’s probably the best method you can use to protect your private folders on Windows PC. You’ll need to enter the two-factor authentication (2FA) code sent to your email account when you want to access a folder in the Private Vault, which is sufficient for anyone who wants to protect their files. To use OneDrive Private Vault to password-protect your folder on Windows 11 or 10:
Install OneDrive from Microsoft Store. The program is always pre-installed on Windows computers, but if you don’t have it, you can use the linked Store to install it.
After OneDrive is installed, select it from the System tray or launch it by searching it via the Windows Search box.
Click on the gear icon on the resulting page and select Unlock Personal Vault.
You’ll then be prompted to set up the Vault by entering the two-factor authentication code sent to your email account or phone number. Do that and wait for the Personal Vault to unlock.
Now, you can move the folder(s) you want to store under password protection to the Personal Vault, which automatically locks after 20 minutes of inactivity. You can also lock the Personal Vault manually by:
Right-click on the Personal Vault folder and select Show more options on the drop-down menu.
Tap on Lock Personal Vault.
Method 2: Use 7-Zip
Another method you can use to password-protect folders in Windows 11 is to use the well-known tool for processing zip files, 7-Zip. The program uses a high-quality encryption protocol to protect your password-protected folders so that no one can access them without your password. Moreover, 7-Zip’s folder encryption is cross-platform, which means that even if you move the folders to another computer, the encryption will remain. Here’s how to use 7Zip on a Windows computer to password-protect a folder:
Download and install 7-Zip from the linked site.
Go to the folder you want to password-protect and right-click on it.
From the resulting drop-down menu, select Show more options.
Now tap on 7-Zip and then select Add to archive.
On the resulting dialogue box, set the Compression level to 0 – Store and check the Delete files after the compression option.
Go to the Encryption section on the same window and enter the password you want to lock the folder with.
After re-entering the password, you should now click on OK to lock the folder. After that, a new folder with the .7z extension will be created, which you can open with any archiving program on your computer and which will ask for your password every time you open a file in that folder.
Method 3: Use Batch File
This is another method you can use to password-protect folders in Windows computers, and pretty straightforward.
Open the folder you want to encrypt and right-click on an empty space.
Click on New from the drop-down menu and select Text Document.
Name the text document anything you want to save the secure folder with, and hit Enter.
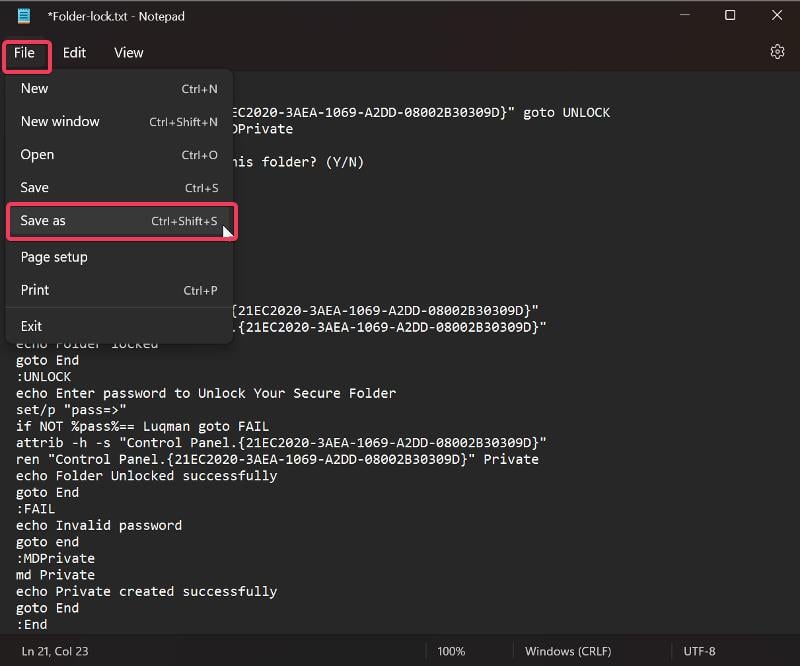
Double-click the text document to open it and paste the text here into the Notepad.
Look for the part of the text where YOUR-PASSWORD is and replace it with the password you’ll like to secure the folder with.
After that, click on File at the top-left corner of the Notepad window and select Save as.
In the File name box, replace .txt with .bat to save the file as a batch file and set Save as type to All files.
Click on Save and then close the Notepad.
The new batch file created will appear on the folder, simply double-click it; on doing that, a folder named Private will be automatically created, and you can move all the files you want to encrypt to the Private folder.
After that, click on the batch file again, press Y, and hit enter. The Private folder will disappear and can only be opened by launching the batch file and entering the password you set earlier. Also Read: Top 7 File Managers for Windows 10/11
Method 4: BitLocker
BitLocker is an encryption method offered by Microsoft for users with some versions of Windows 11 and some other Windows versions to use in keeping this entire drive safe from unauthorized access through data recovery. It is also a way you can use to protect folders on your Windows 11 computer. Here is how to set up BitLocker on Windows 11:
Search for BitLocker through the Window search box and open the Manage BitLocker option.
You’ll be taken to a page on the Control Panel where you should click on Turn on BitLocker. In case you have more than one drive, you can restart this process for other drives as well.
On the resulting page, you will be prompted to set how you want to back up your recovery key; select the one you see fit. This recovery key will be your only way to access your drive if you forget your password.
Tap on Next and follow the on-screen prompts.
Finally, click on Restart now, and your computer will start encrypting your drive.
Method 5: Password Protect Folder With Third-Party Apps
There are several third-party applications that allow you to password-protect your folders, such as Folder Lock, Easy File Locker, and many others. These applications are very easy to set up and can be used to secure folders on your Windows PC instead of using the methods described earlier.
Method 6: Protect Folders on Group PC
If you use a computer with multiple users and want to protect some folders so that only you can access them, there is a way to do it.
Right-click on the folder you want to protect and click on Properties.
Select Advanced on the resulting dialogue box.
Check the Encrypt contents to secure data box and click on OK.
Now select either Encrypt the files and their parent folder or Encrypt the file only and hit OK. Read: 6 Ways to Take Screenshots in Windows 11
Final Words
By using passwords for your folders, you can prevent others from accessing your files. While there’s no native way to password-protect folders in Windows computers, you can still do so using various workarounds, the best of which we present for you in this article.
Further Reading:
How to Encrypt a USB Drive on Windows 10 How to Install and Use Wget on Mac and Windows 11 Best Windows 11 Apps You Must Download
- Right-click the folder you want to hide and select Properties.
- On the resulting dialogue box, check the box for Hidden, hit Apply, and select OK.
- If the hidden folder is still showing, click on the View tab at the top of your File Explorer window.
- Navigate to Show and uncheck the Hidden items option.


